 US Dollars
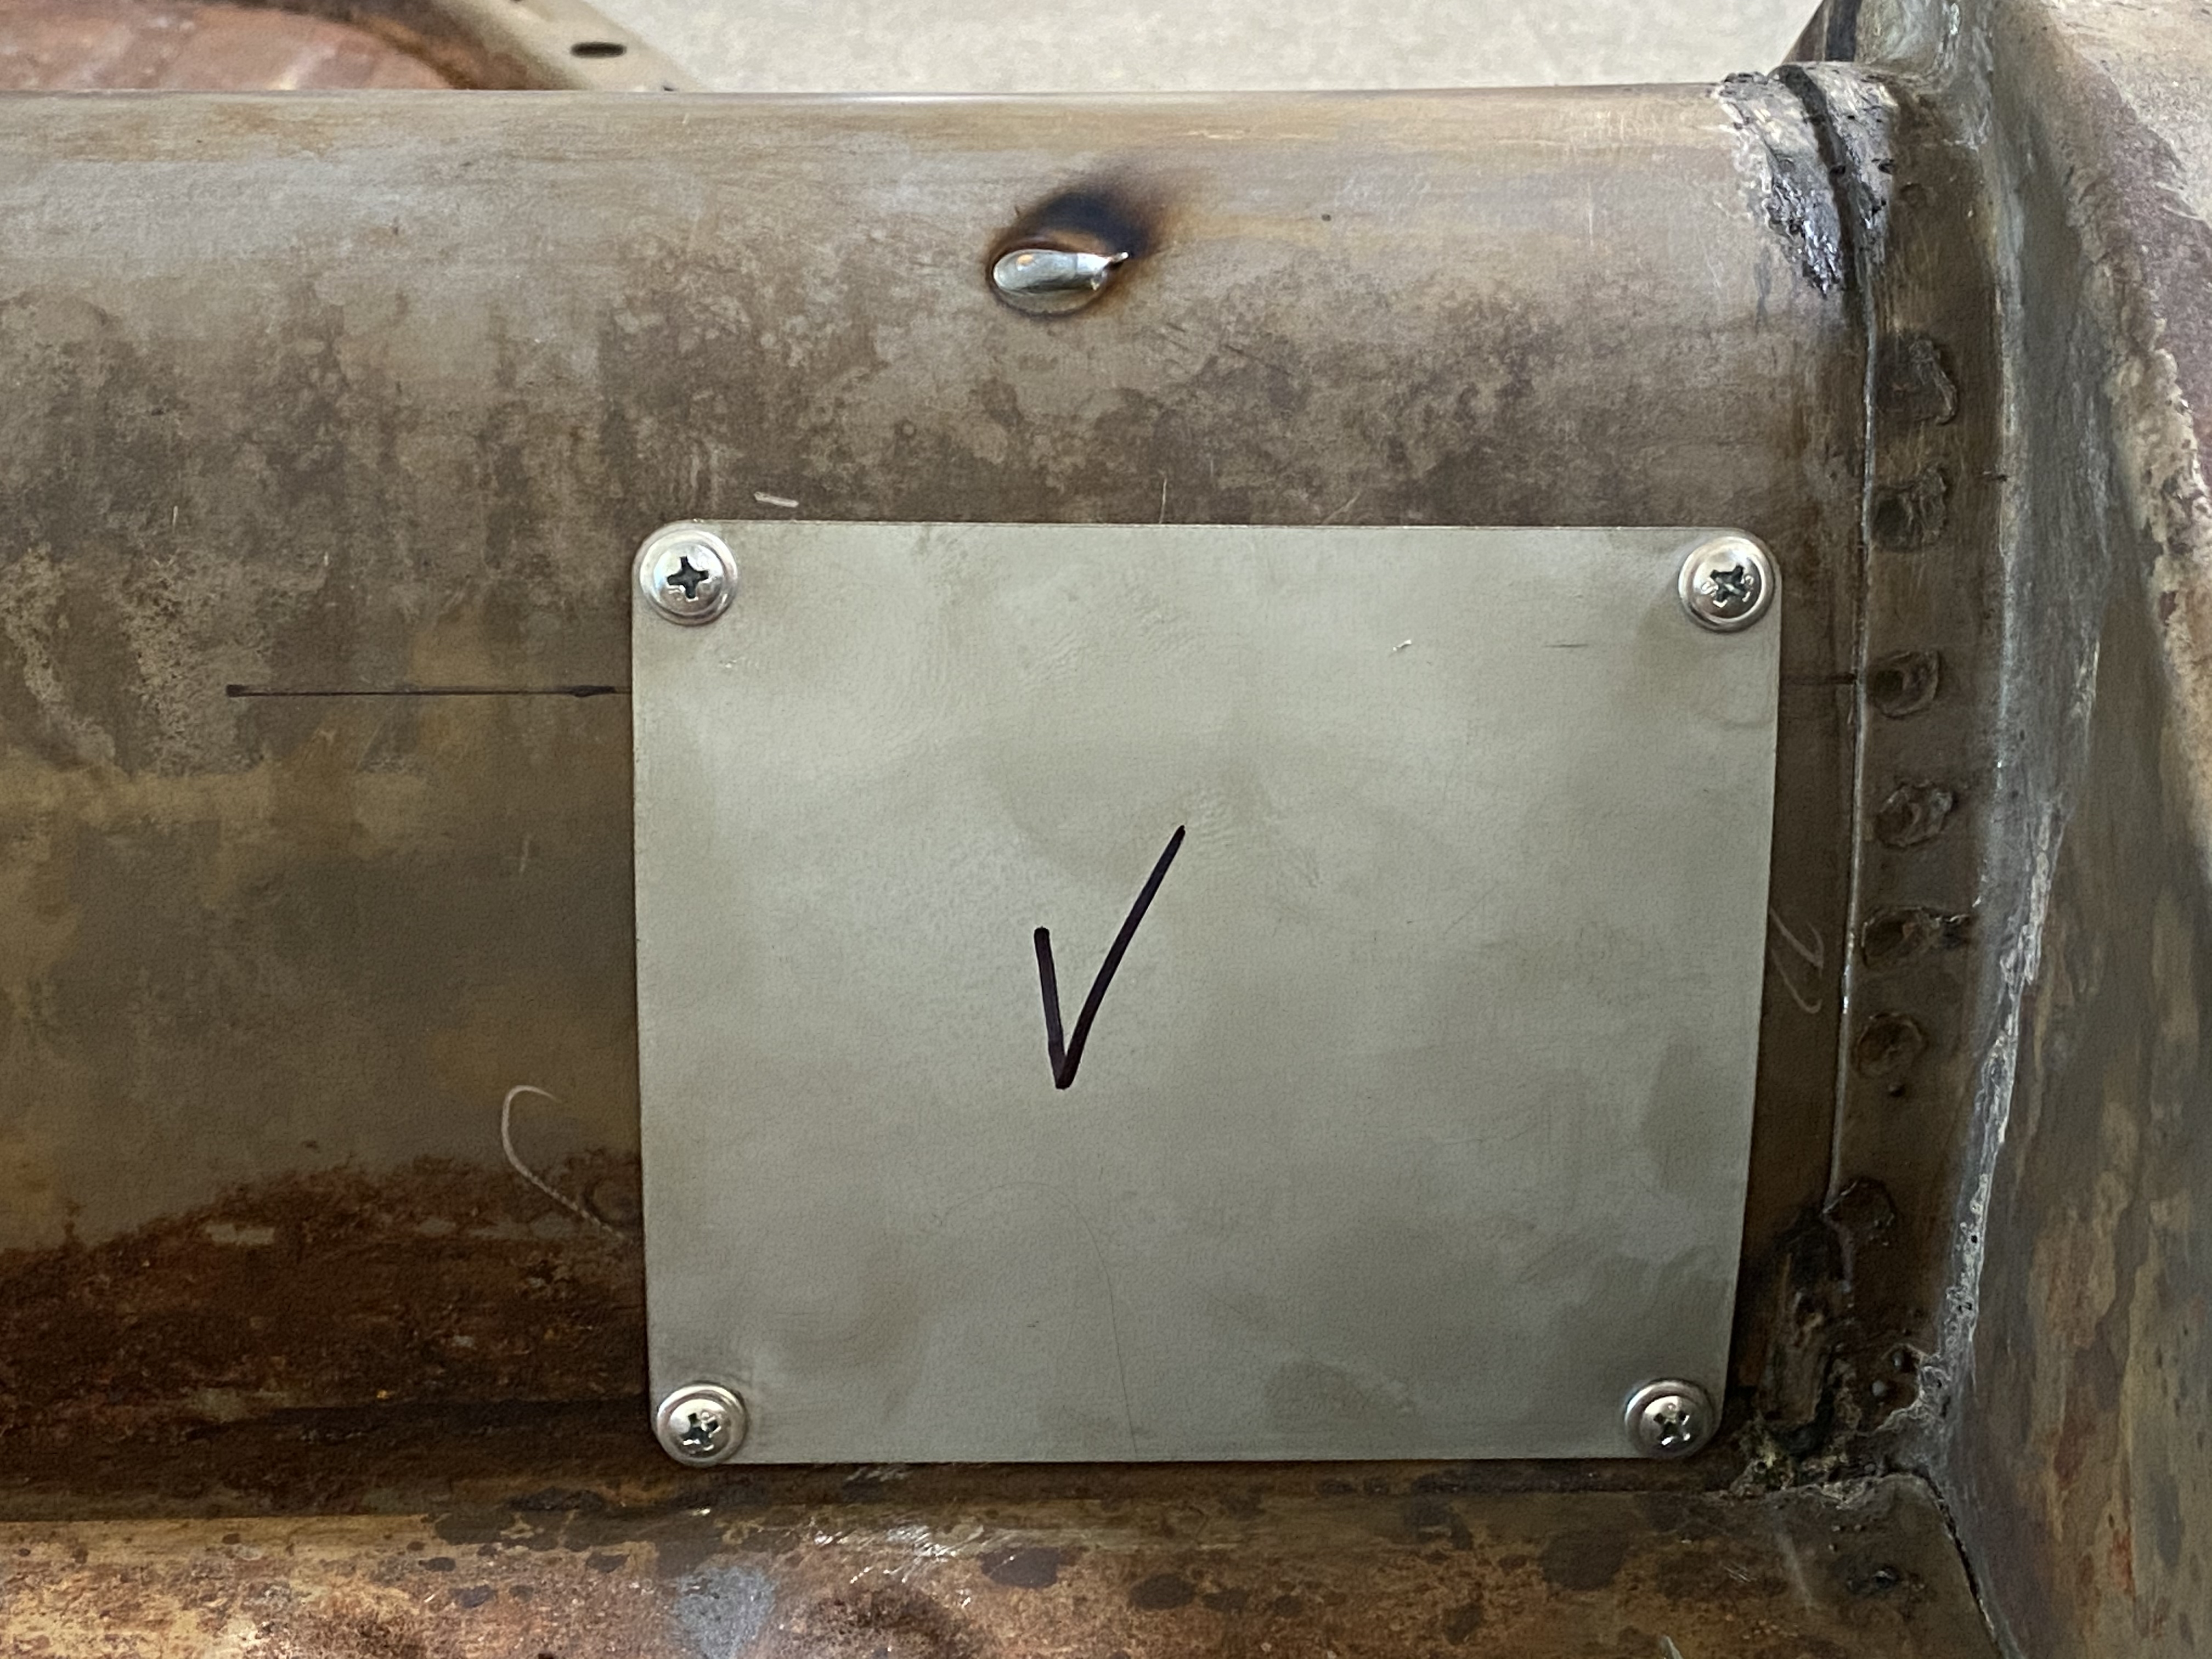
Chassis Inspection Plate Install
Cut once. Service forever. Direct access to the clutch cable and tube bracket inside the chassis tunnel — change a cable in five minutes without pulling the pedal assembly.
From "Hidden Under the Carpet" to Five-Minute Service
For decades, fixing the clutch tube area was a hatchet job. Hole-saw a circle. Cut three sides of a square. Pry the metal out. Hammer it flat-ish. Hide the whole mess under a carpet kit. Standard practice for 75 years — nobody loved it, but nobody had a better way.
Airkewld built one. A clean rectangular cutout, a finished cover plate with four corner screws, and one move you can repeat: pop the plate, service the cable, button it back up.
Pop the plate. Swap the cable. Button it back up. No pedal assembly to remove. No adjustments lost. Five minutes.
And once the access port exists, it earns its keep beyond clutch cables. Air lines for an air suspension setup. Stereo wiring through the tunnel. Performance fuel lines. The plate makes the chassis serviceable for the first time in 75 years.
Doesn't Cutting the Tunnel Weaken the Chassis?
Worth saying out loud: some VW purists argue the cutout weakens the chassis in a crash. We hear it. Here's the reality —
For decades, repairs to this exact area have been made with air chisels, hole saws, and pliers — usually without ever being welded back up. Stress cracks or bends from these openings have never been seen to cause real-world failures. The damage that the inspection plate replaces is already there in most chassis we see.
The Airkewld plate is better than no fix: four screws clamping at the corners give the tunnel back more rigidity than a hammered-in flap of sheet metal ever did. The cover plate also seals the tunnel against road grime — something the old hatchet jobs never did.
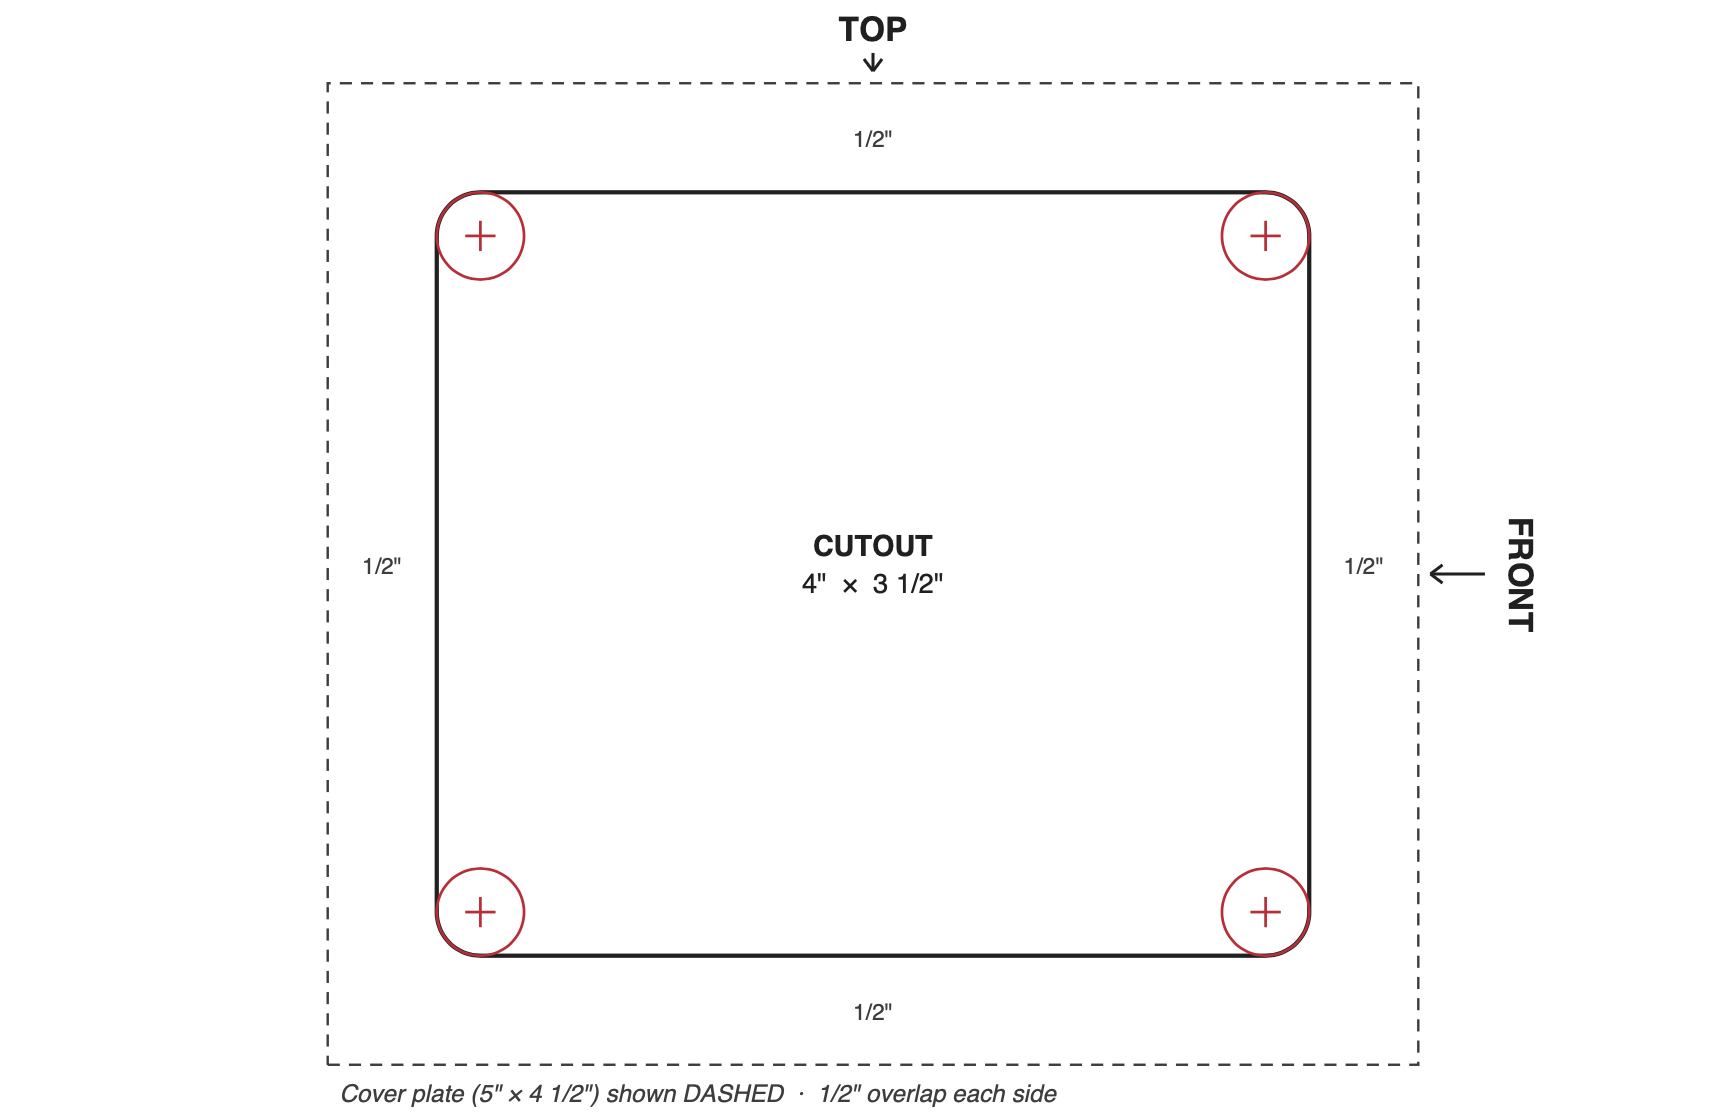
The Numbers You Need Before You Cut
Cutout
4″ × 3 1/2″Radiused corners
Reference
1/2″ · 1 1/2″Up from floor · back from firewall
Cover Plate
5″ × 4 1/2″1/2″ overlap per side
Screws
(4) PhillipsDrill motor — no impact
Real Chassis Damage — And Why This Plate Exists
The kinds of repairs we see every week. Some hidden under carpet for 30 years. The inspection plate makes them clean, sealed, and serviceable.
Old-School "Fix"
Hole-sawed once, hammered flat, hidden under a carpet kit for 30 years. Standard practice. Not anymore.
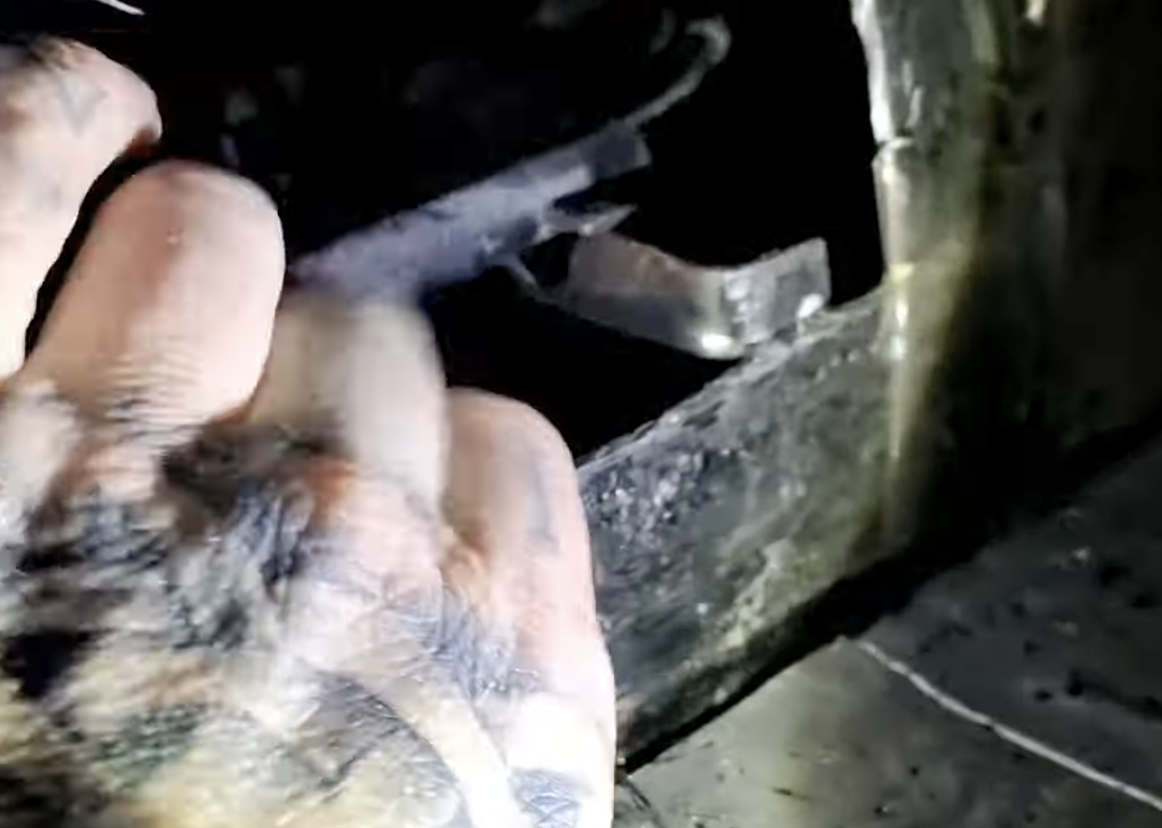
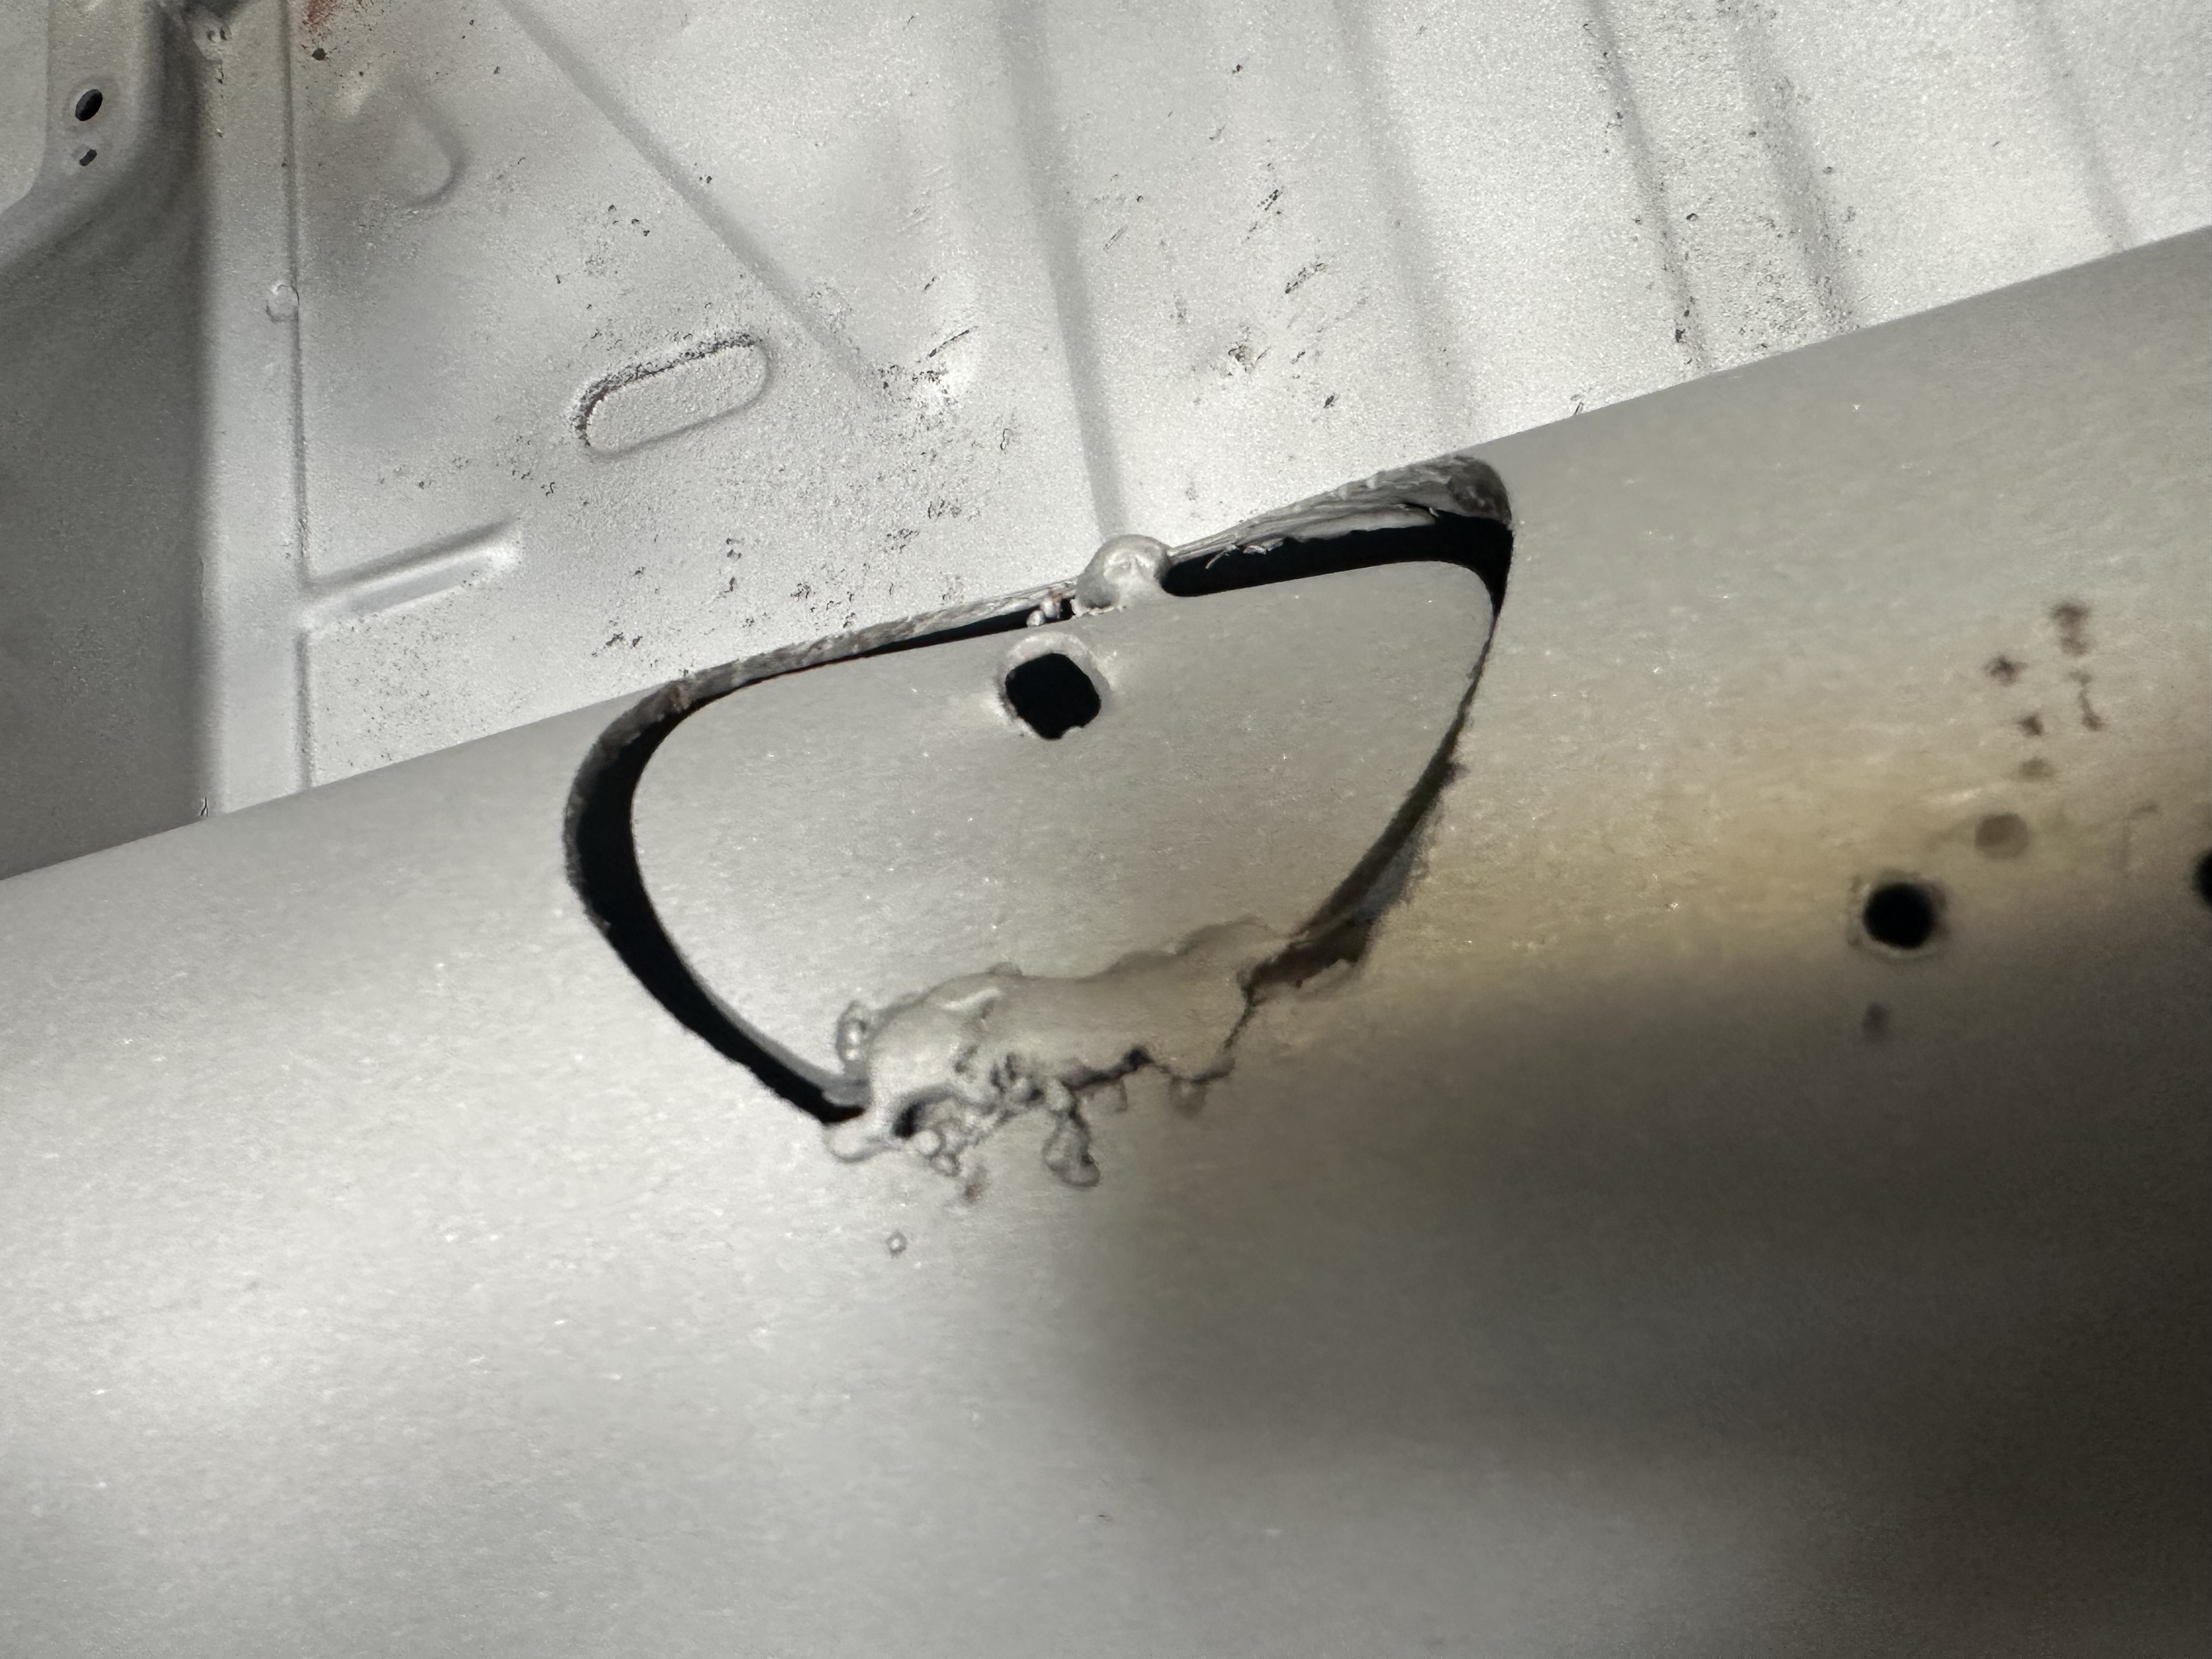
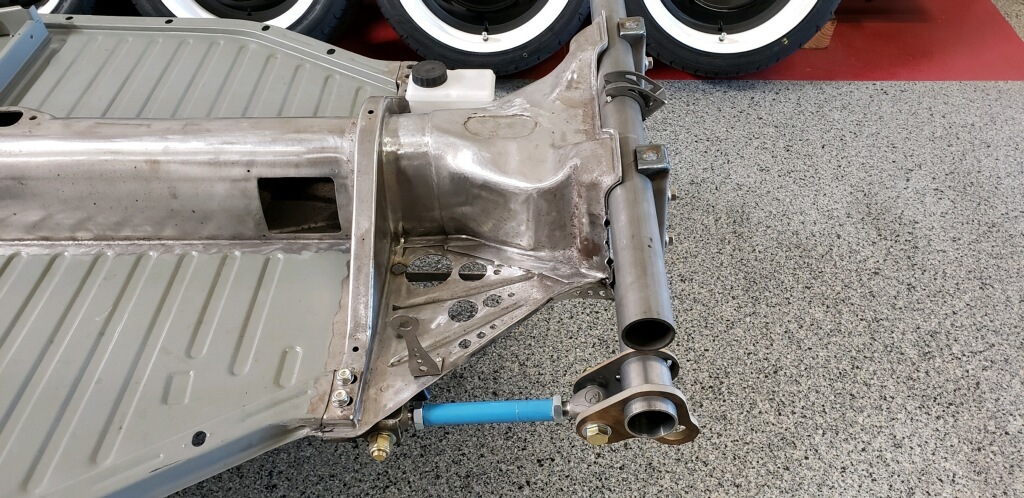
Clutch Tube Pulled Loose
Heavier-than-stock pressure plates pull the tube right out of its bent-tab bracket. Common, ugly, and impossible to fix without access.
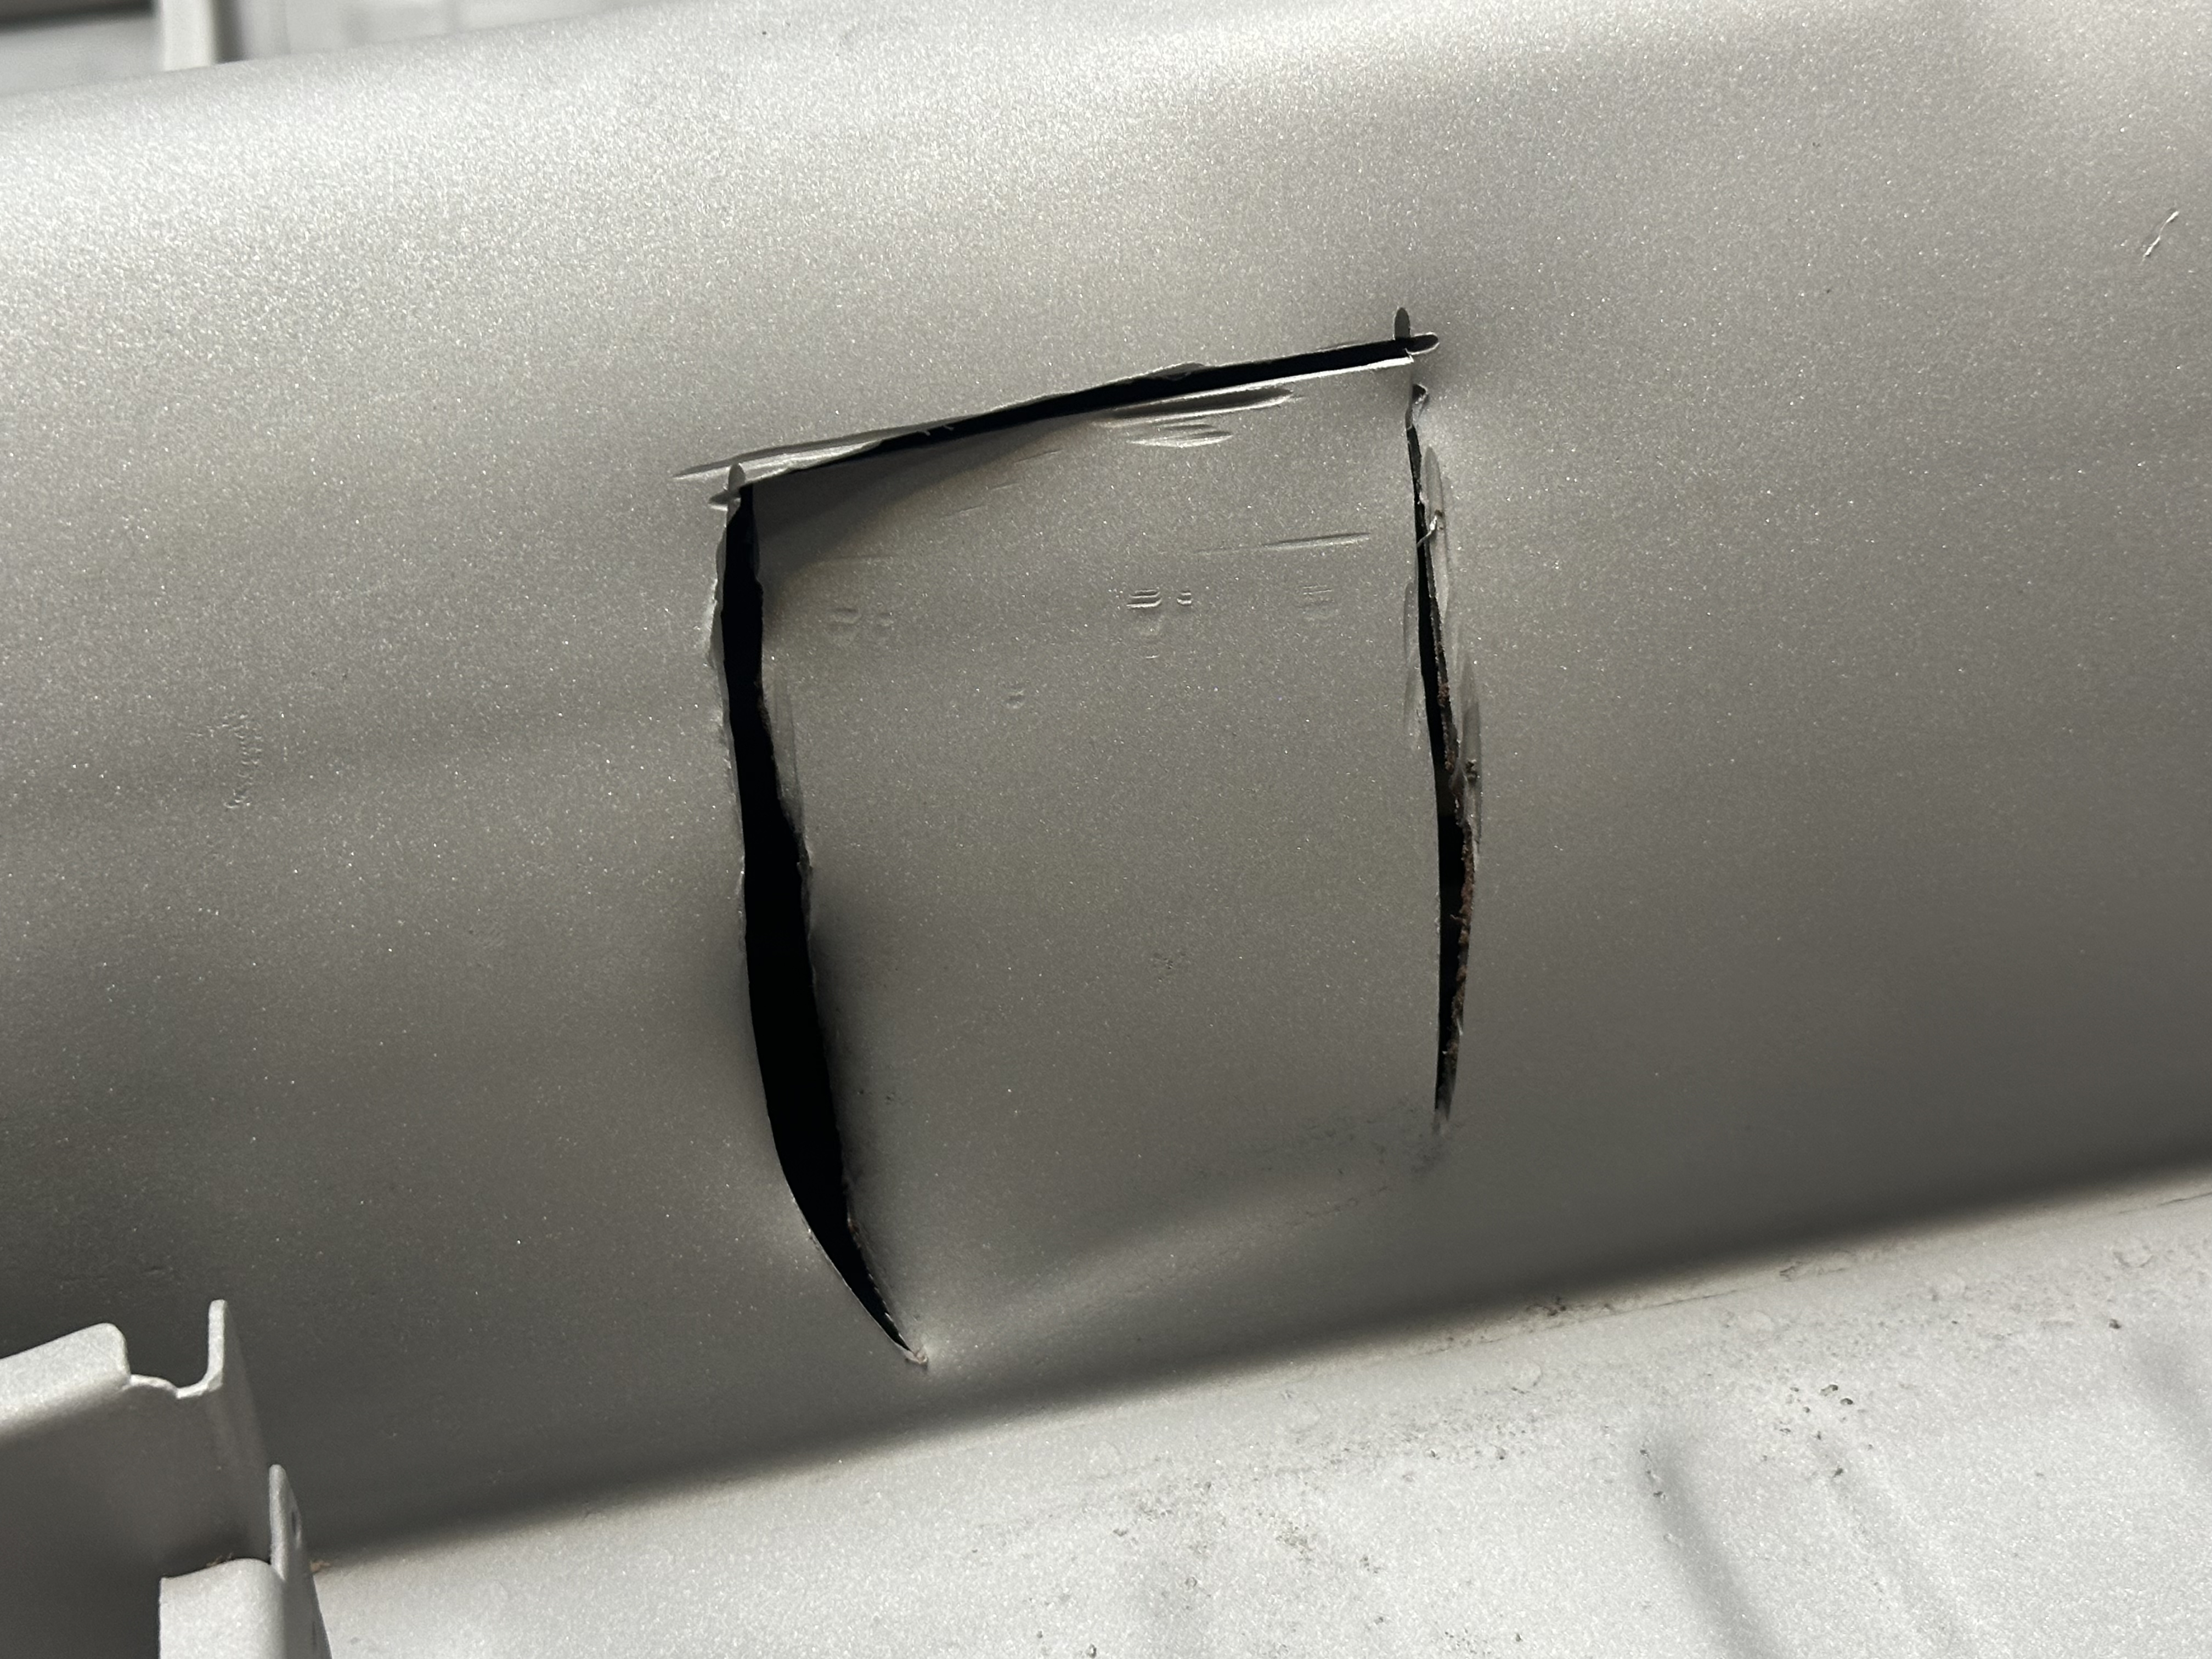
Air Chisel Aftermath
Three sides cut, pried open, never welded back. The tunnel was exposed to road grime for the rest of the car's life.
The Clean Cut
4″ × 3 1/2″ cutout, four radiused corners, every edge deburred. The right way the first time.
Tube Re-Welded
Loose clutch tube tacked and welded back to the bracket through the new access port. Short low-heat passes. Forever-affixed.
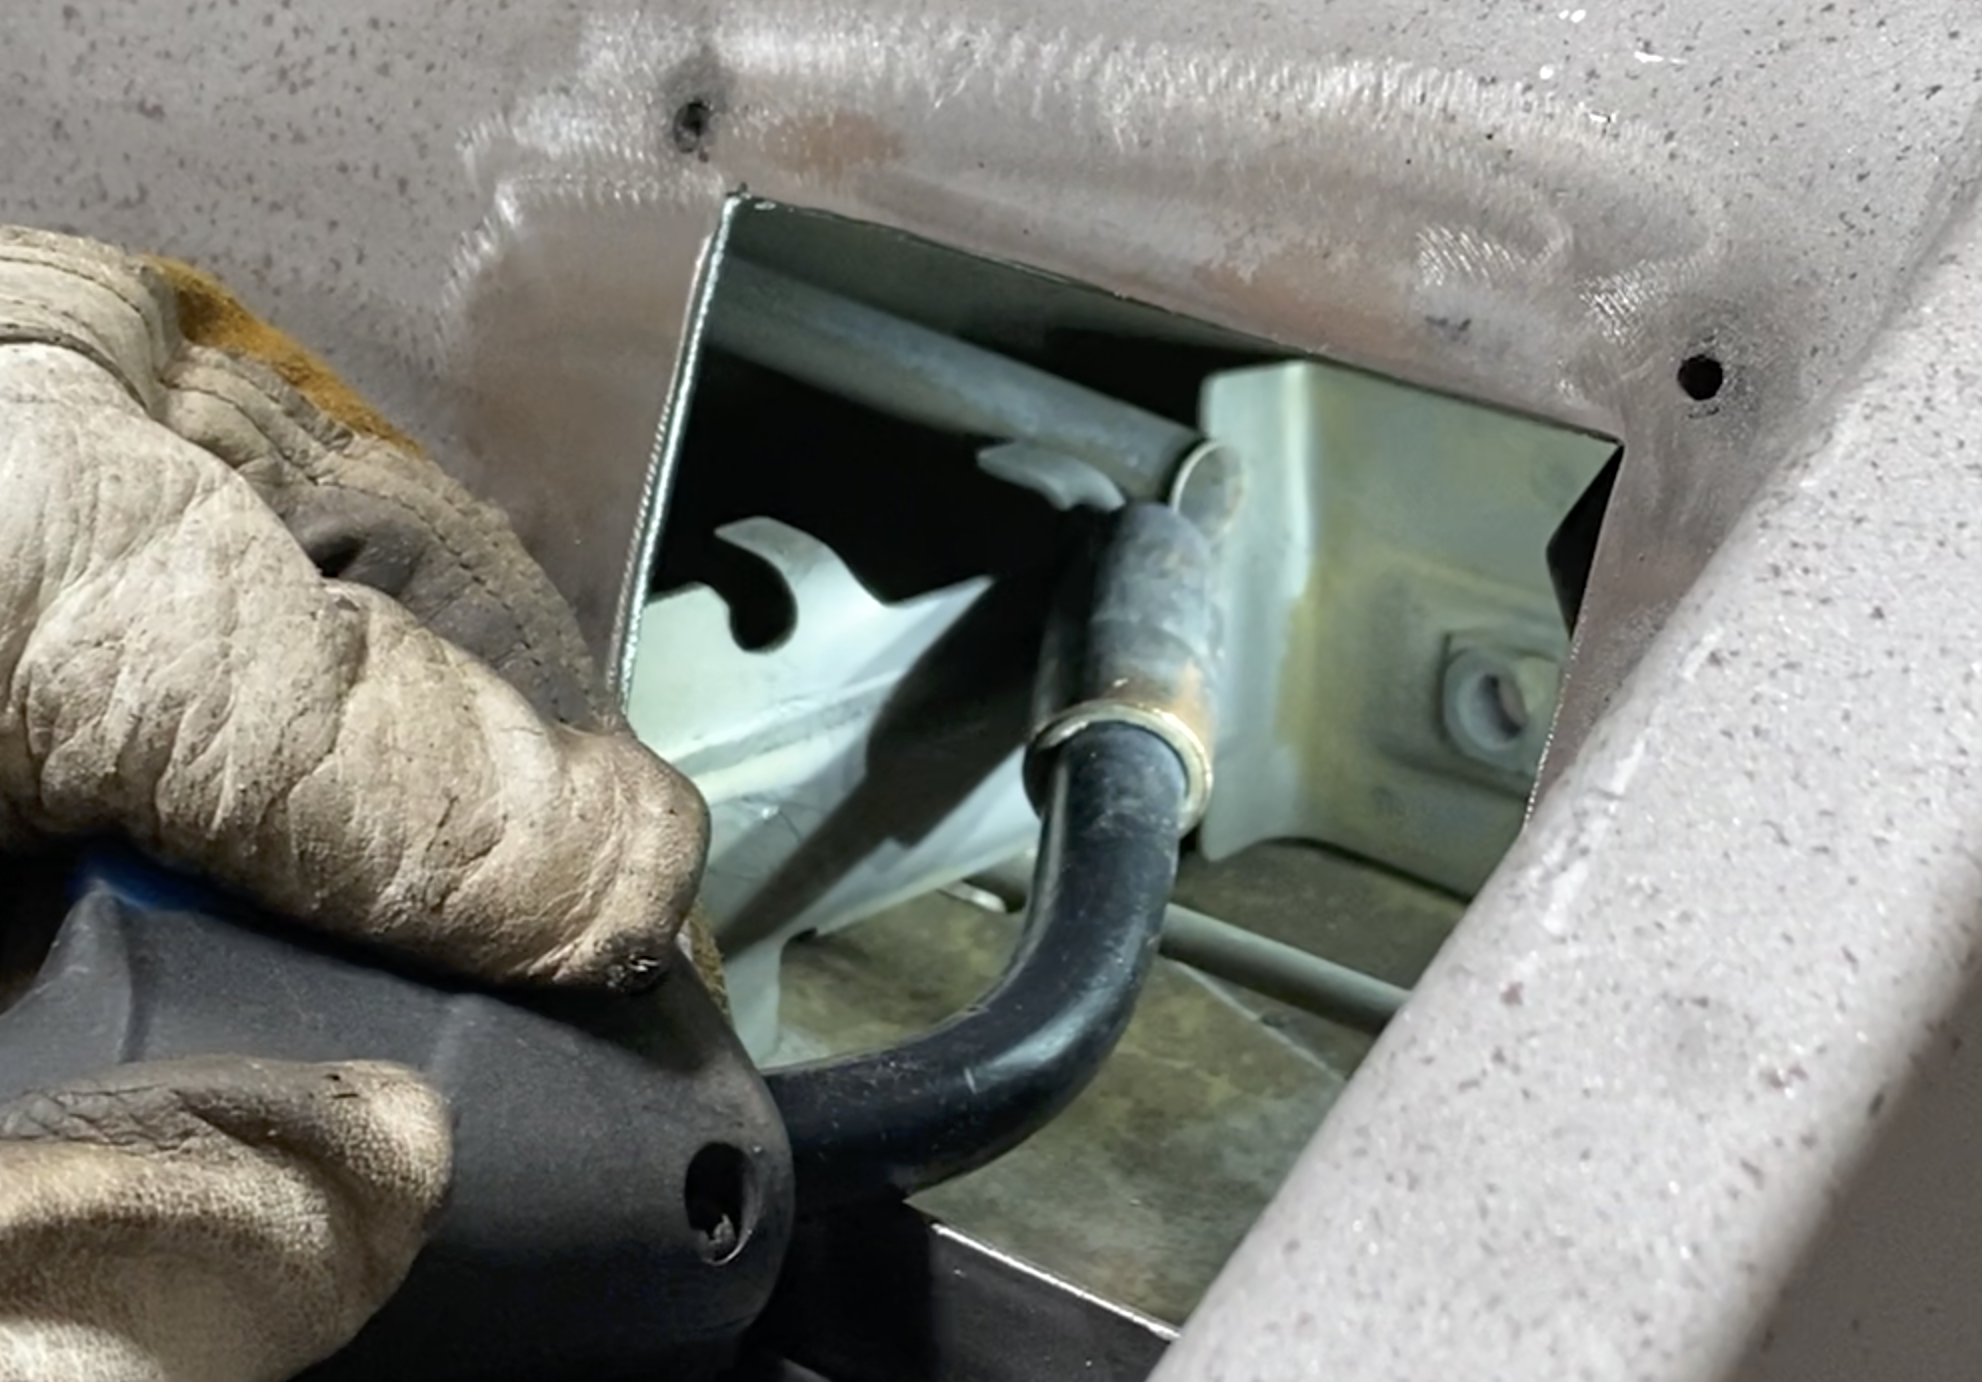
Sealed & Serviceable
Plate flush, primed, four screws clamping. Carpet drops back over it. Pop it any time you need to service the cable.
Everything You Need · Nothing You Don't
One plate. Four screws. A 1:1 cut template you can print at home. That's it.
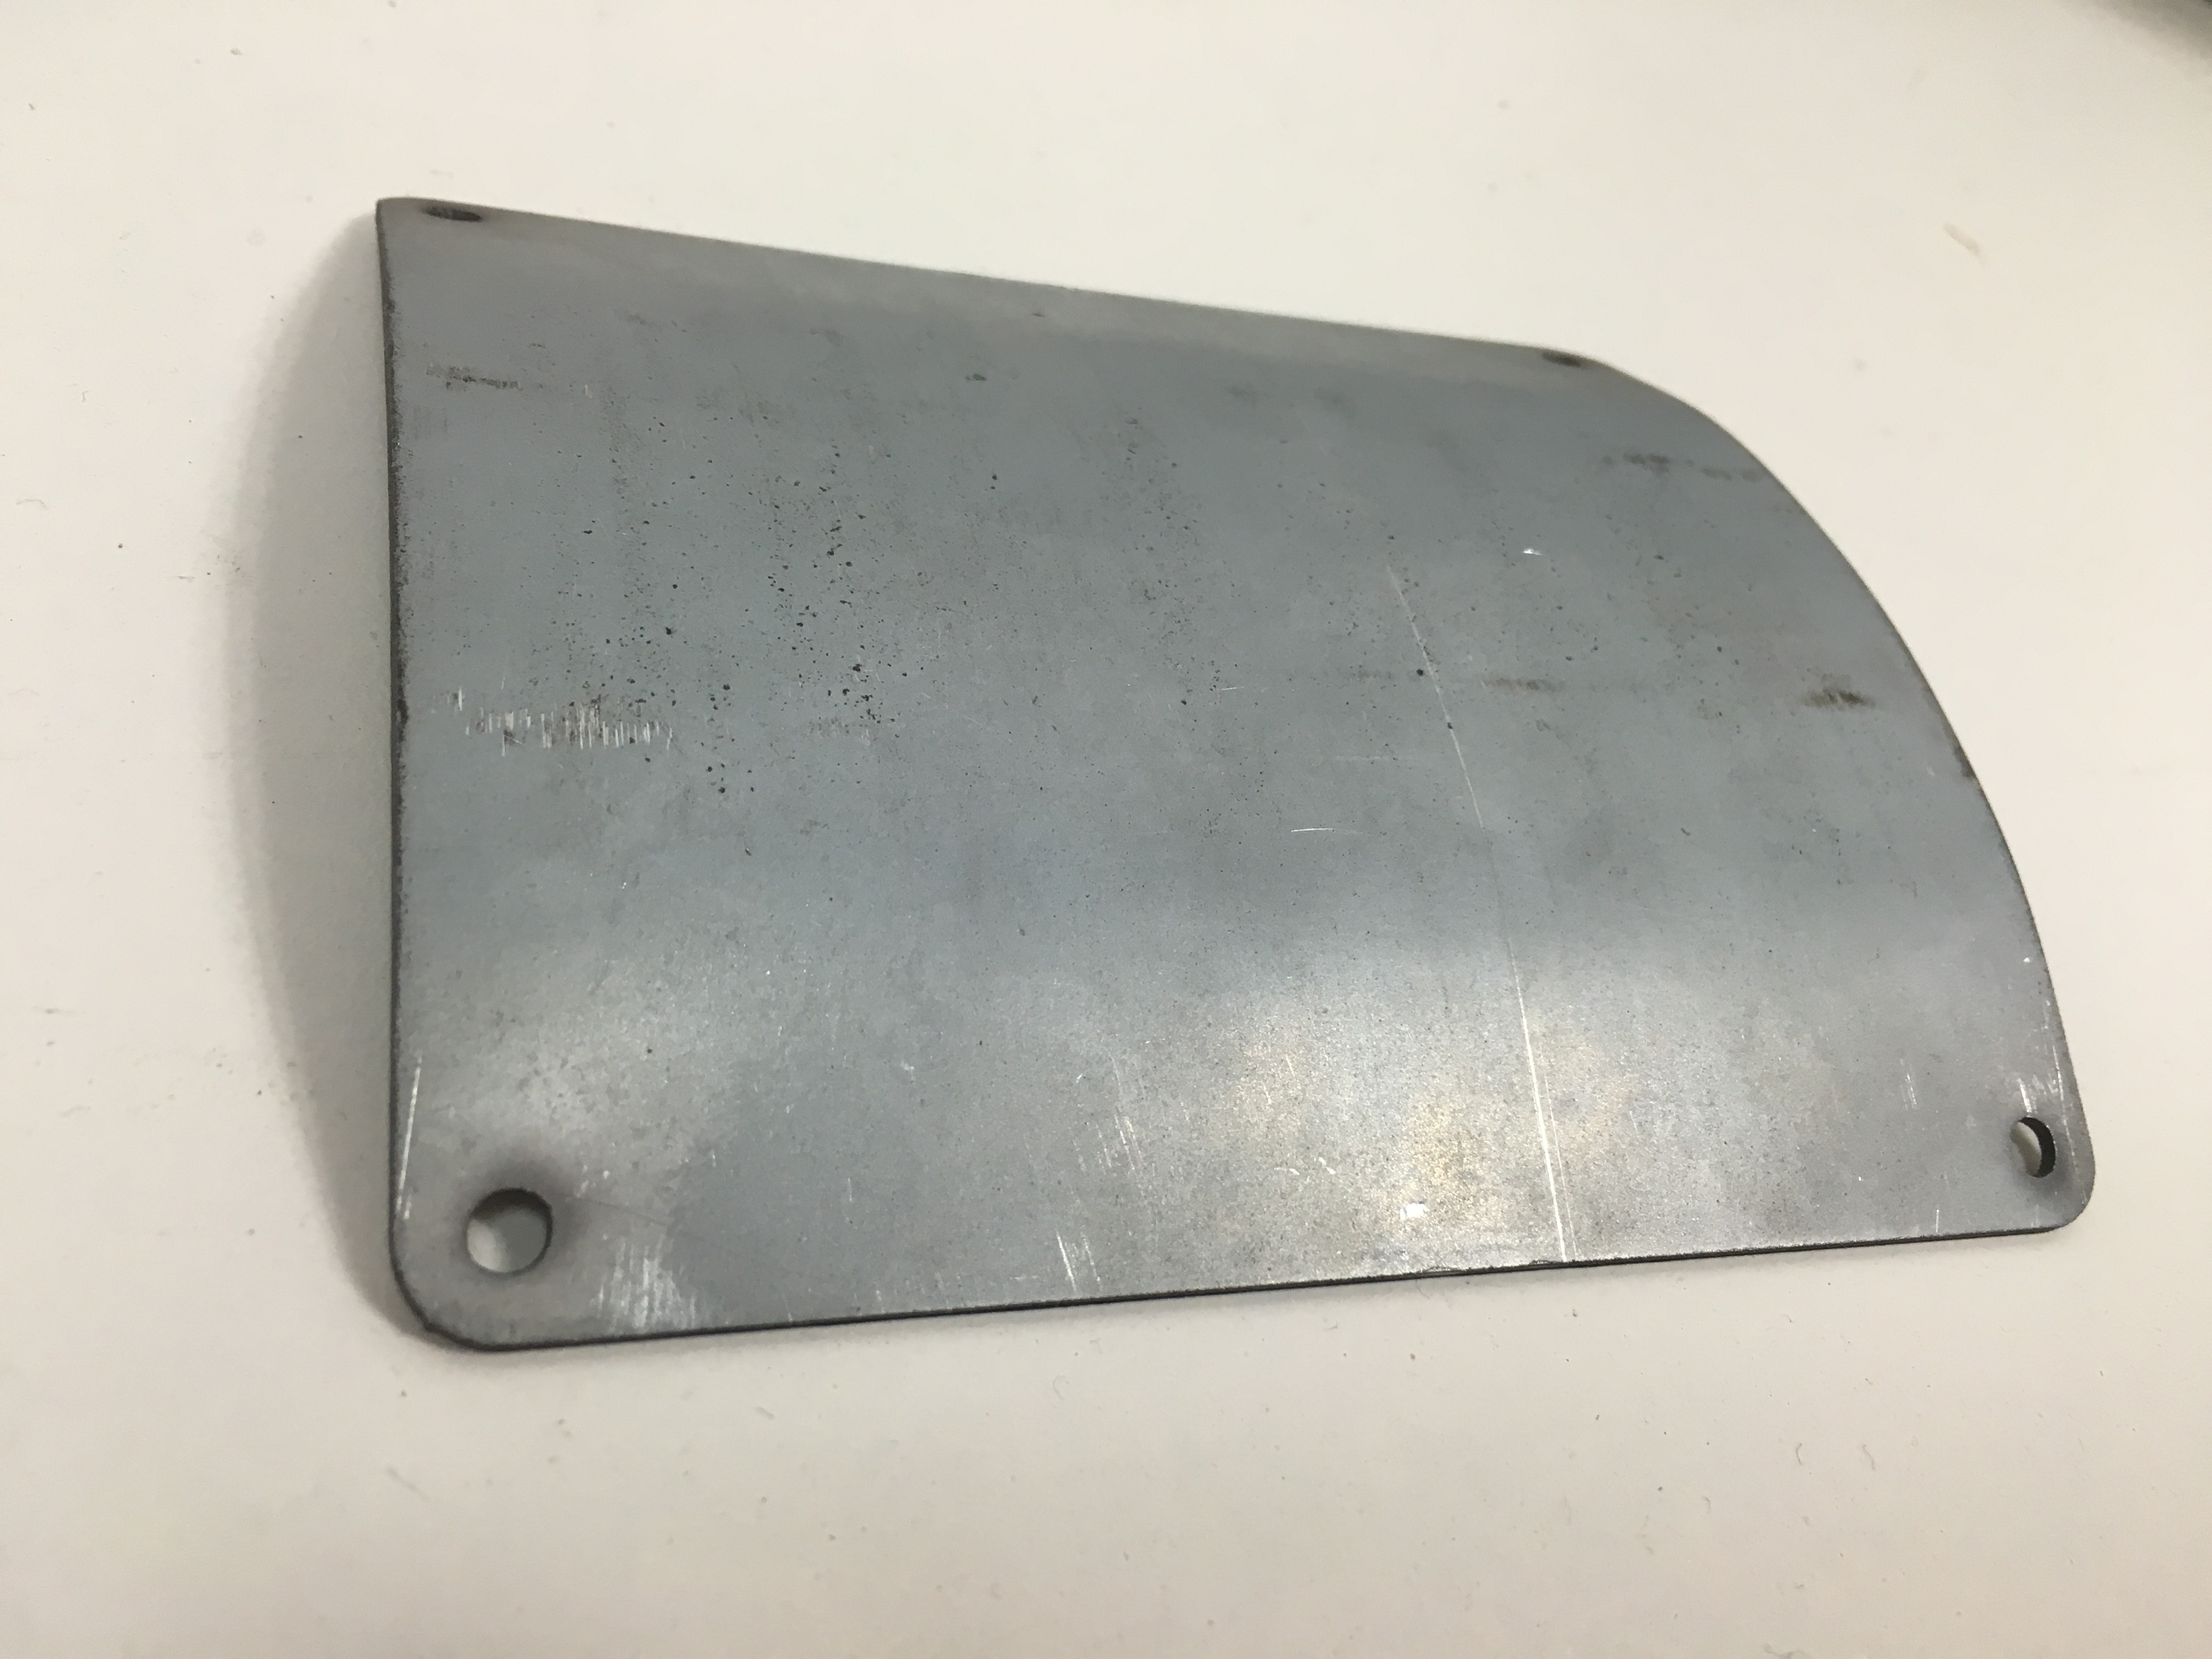
The Cover Plate
5″ × 4 1/2″ sheet steel with 4 pre-drilled screw holes. 1/2″ overlap on every side hides minor cutout mismatches. Primer-ready surface.
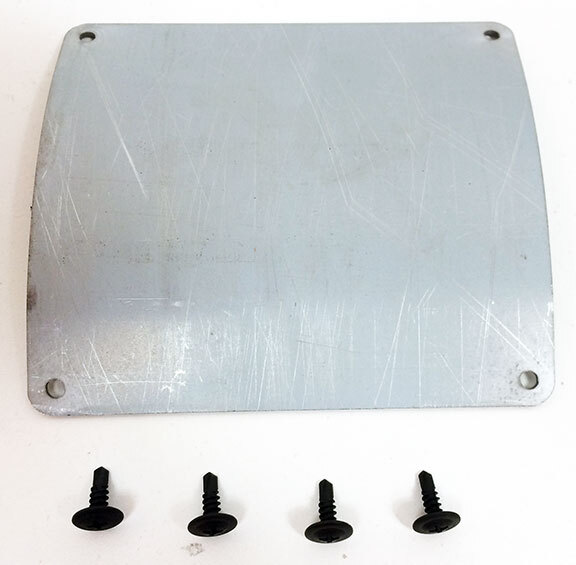
(4) Phillips Screws
Self-tapping into the tunnel — one per corner. Drill motor + Phillips bit, KEEP PRESSURE on each one — impact drivers cam out and strip these. Snug only, not torqued.
1:1 Cut Template
Page 3 of the install guide PDF. Print at 100% / Actual Size and verify the 1″ reference square measures exactly 1″ before marking the tunnel.
Ready to Make Your Chassis Serviceable?
Plate, screws, template — everything ships in one box.
The Whole Install · On Video
Watch the cut, the deburr, the clutch tube weld, and the plate install end-to-end before you make your first mark. The video covers exactly what's in this guide.
Then come back here for the dimensions, the tools, and the troubleshooting Q&A.
The Top 5 Install Mistakes — And How to Avoid Them
Cutting steel is a one-way operation. Get these five right and the install is a clean 60-minute job that lasts.
Cutting Without Measuring Twice
Mark all four lines from the chassis references — floor pan and firewall — not from carpet or trim. Lay the rectangle out with a Sharpie before any tool touches metal.
Drilling Corners Without Center-Punching
Step bits walk on smooth steel. Center-punch each corner first — skip this and the radii end up off-center, the rectangle goes crooked, and the cover plate won't sit flush.
Skipping the Deburr
Sharp edges from the cutoff wheel will catch carpet, fingers, and the clutch cable. File or sand every edge AFTER cutting and BEFORE priming.
Stripping Screws (Impact Driver)
The (4) supplied Phillips screws self-tap into the tunnel. Use a drill MOTOR — not an impact — and KEEP PRESSURE on each screw or you'll cam out and strip the head before it bites.
Welding the Clutch Tube Hot
The clutch tube is THIN-WALL. If the bracket is loose, tack first then finish-weld in short low-heat passes. Burn through and you've replaced a $5 fix with a $200 cable run.
Tools Required · Shop the Build
Every tool below is what we keep on our own benches. Affiliate links support the channel — same price to you.

Tape Measure
For laying out the rectangle from the floor pan and firewall references. Measure twice, mark once.
Shop on Amazon
Center Punch
Spring-loaded or hand-and-hammer. Mandatory at every corner — the step bit will walk without it.
Shop on Amazon
Step Drill Bit
3/8″ to 1/2″ range works. The bit IS the corner radius — drill all four to the same step.
Shop on Amazon
Angle Grinder + Cutoff Wheel
For the four straight cuts between corner holes. Air saw works too. Slow and steady, follow the Sharpie.
Shop on Amazon
Welder (TIG / MIG)
Only needed if the clutch tube is loose in its bracket. Short low-heat passes — the tube is thin-wall.
Shop on Amazon
Drill Motor
For driving the (4) Phillips screws. NOT an impact driver — impacts cam out and strip these screws fast.
Shop on Amazon
Phillips Bit
Match to the supplied screws. Keep one fresh on the bench — worn bits are how stripped heads start.
Shop on Amazon
Self-Etching Primer
Cut metal rusts fast. Prime every edge of the cutout AND the back of the plate before final install.
Shop on AmazonAirkewld is a participant in the Amazon Services LLC Associates Program. As an Amazon Associate, we earn from qualifying purchases — at no additional cost to you.
Step by Step · The Way We'd Cut It
Read each phase. Match each photo. Don't skip the Pro Tips — this is a one-way operation on a 75-year-old chassis.
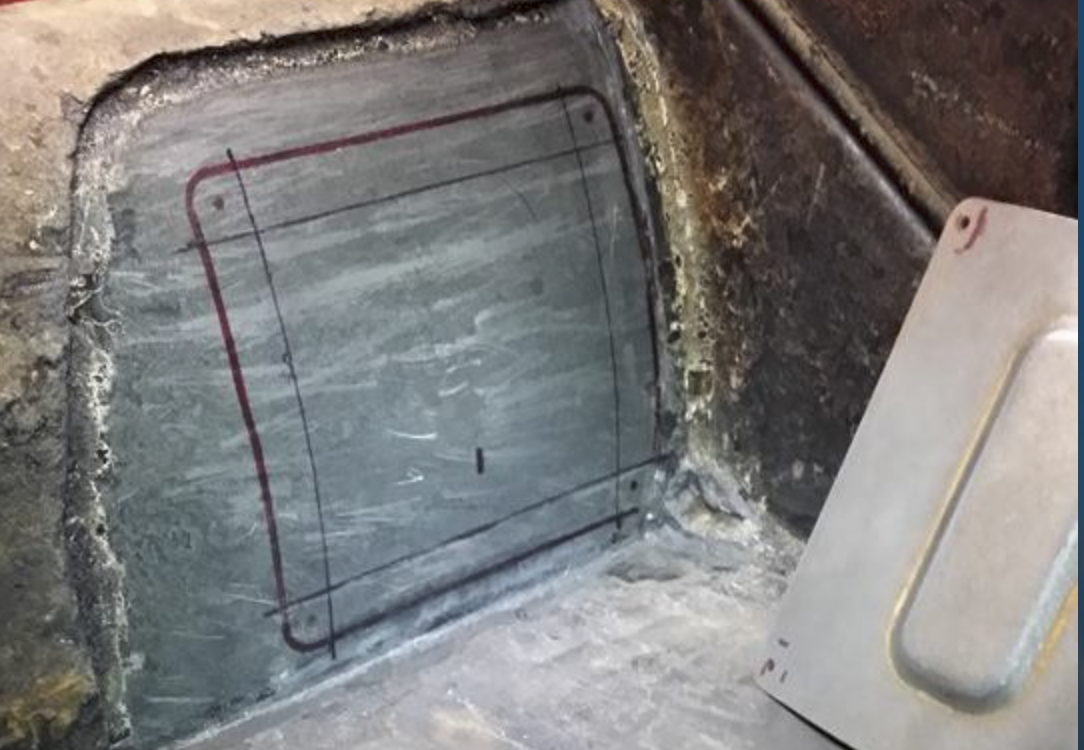
Access & Mark
- Access the tunnel opposite the pedal assembly. Pull carpet back (or remove) if the car is complete.
- Mark BOTTOM line: 1/2″ up from the floor pan — Sharpie a 6″ line.
- Mark TOP line: 4″ up from the floor pan — second Sharpie line parallel to the first (cutout = 3 1/2″ tall).
- Mark FRONT line: 1 1/2″ back from the firewall — Sharpie a 5″ line.
- Mark REAR line: 5 1/2″ back from the firewall — second Sharpie line (cutout = 4″ wide).
- Verify rectangle visually before drilling — corners square, lines parallel.
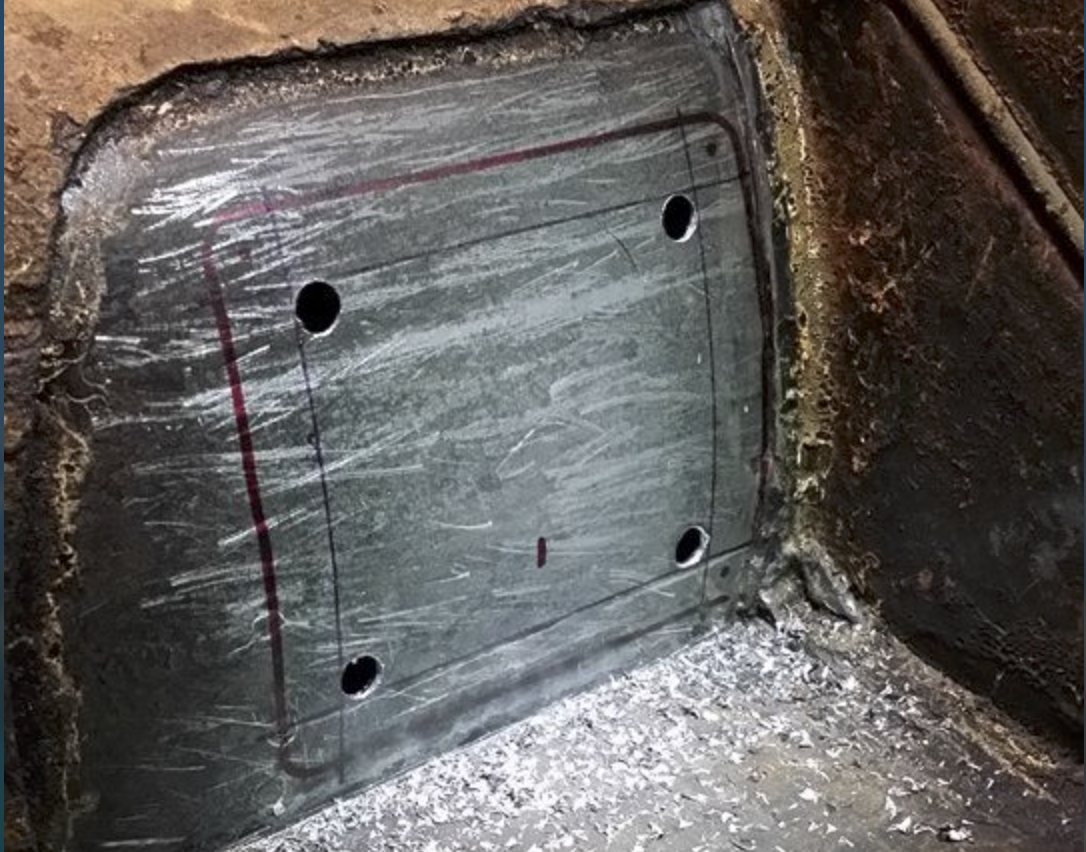
Punch & Drill Corners
- Center-punch all four corners exactly where the lines meet. No punch = step bit walks.
- Step-drill each corner — these holes ARE the cutout's corner radii.
- Drill all four corners to the SAME step on the bit so the radii match.
- Don't go too deep — every step bigger enlarges the cutout. The cover plate forgives 1/2″ of slop on each side, but don't push it.
The step bit IS the corner radius — pick the diameter you like (3/8″ to 1/2″ works), drill all four corners to that same step. If a corner ends up oversized, don't sweat it: the 5″ × 4 1/2″ cover plate has 1/2″ of overlap on every side and hides minor mismatches.
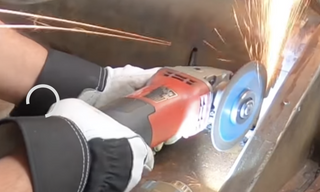
Cut & Deburr
- Cutoff wheel or air saw — connect the drilled holes with straight cuts along the Sharpie lines.
- Drop the rectangular slug out of the tunnel.
- File or sand EVERY edge until smooth. No burrs.
- Wipe clean before next phase.
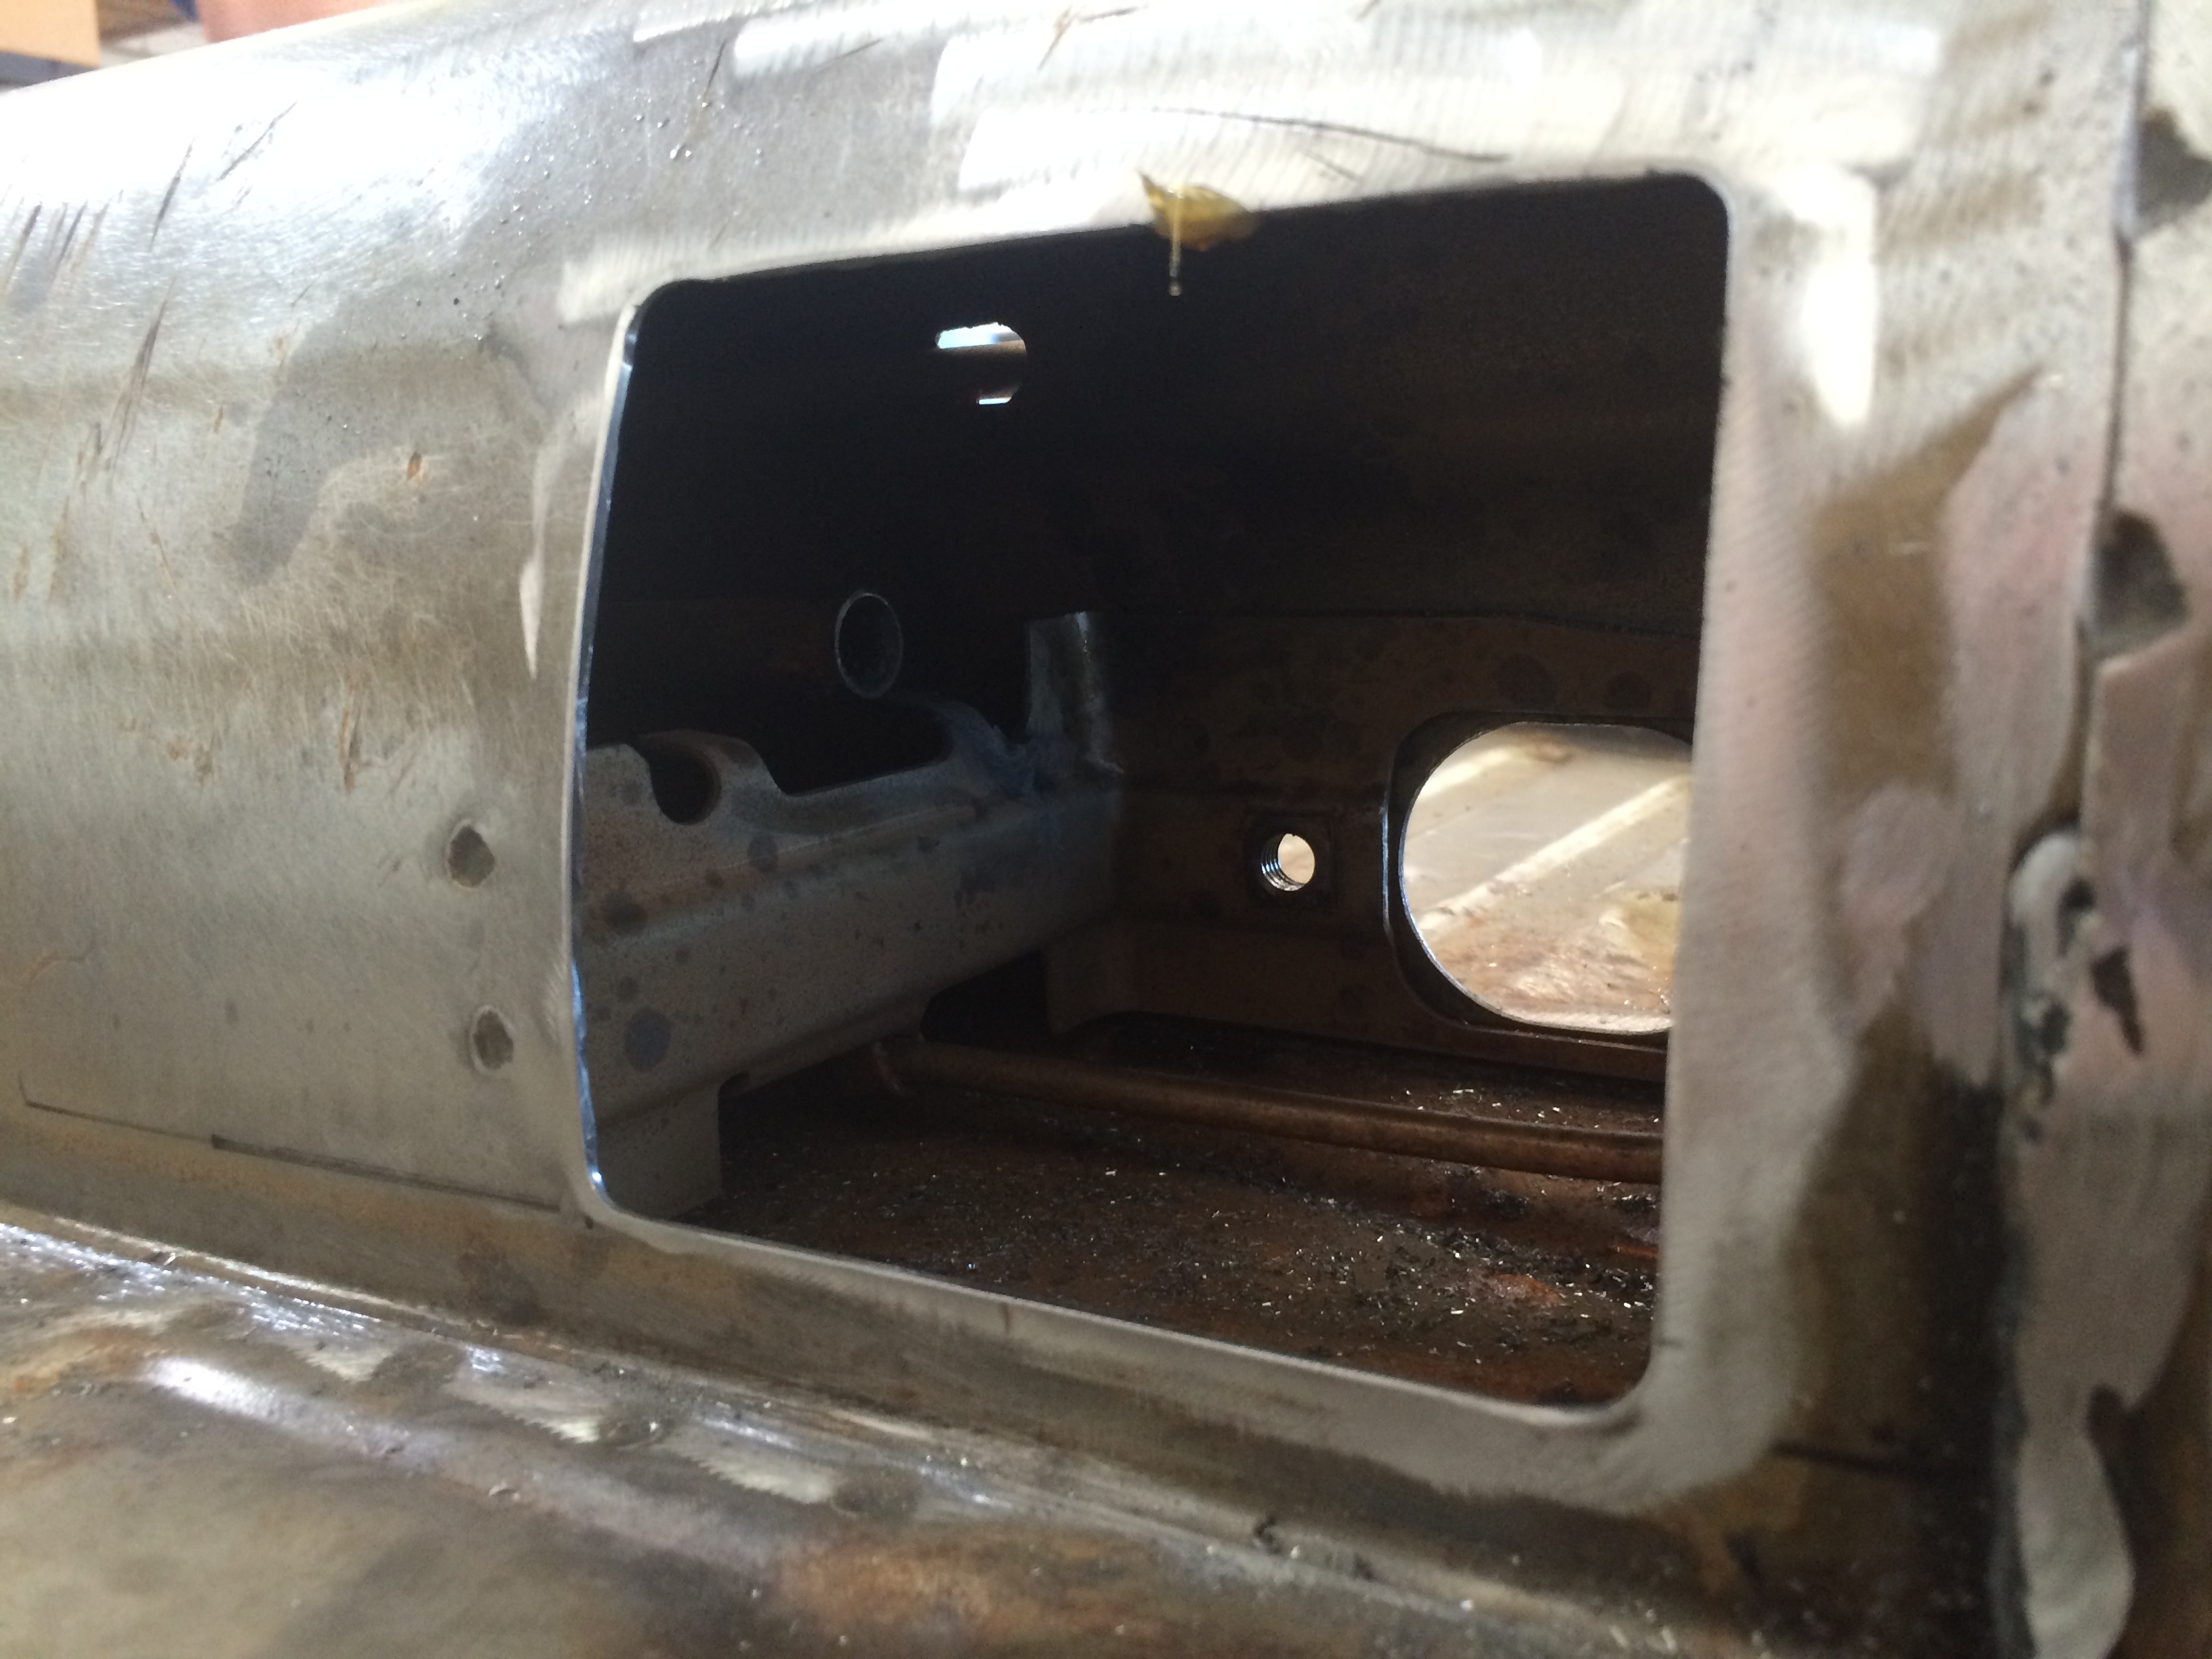
Clutch Tube Inspection
- Reach into the tunnel and locate the clutch-cable tube and its bracket.
- If the tube is loose in the bracket: reposition until snug.
- TACK weld first — verify nothing moved.
- Finish weld in SHORT, LOW-HEAT passes. The clutch tube is thin-wall — burn through = new cable run.
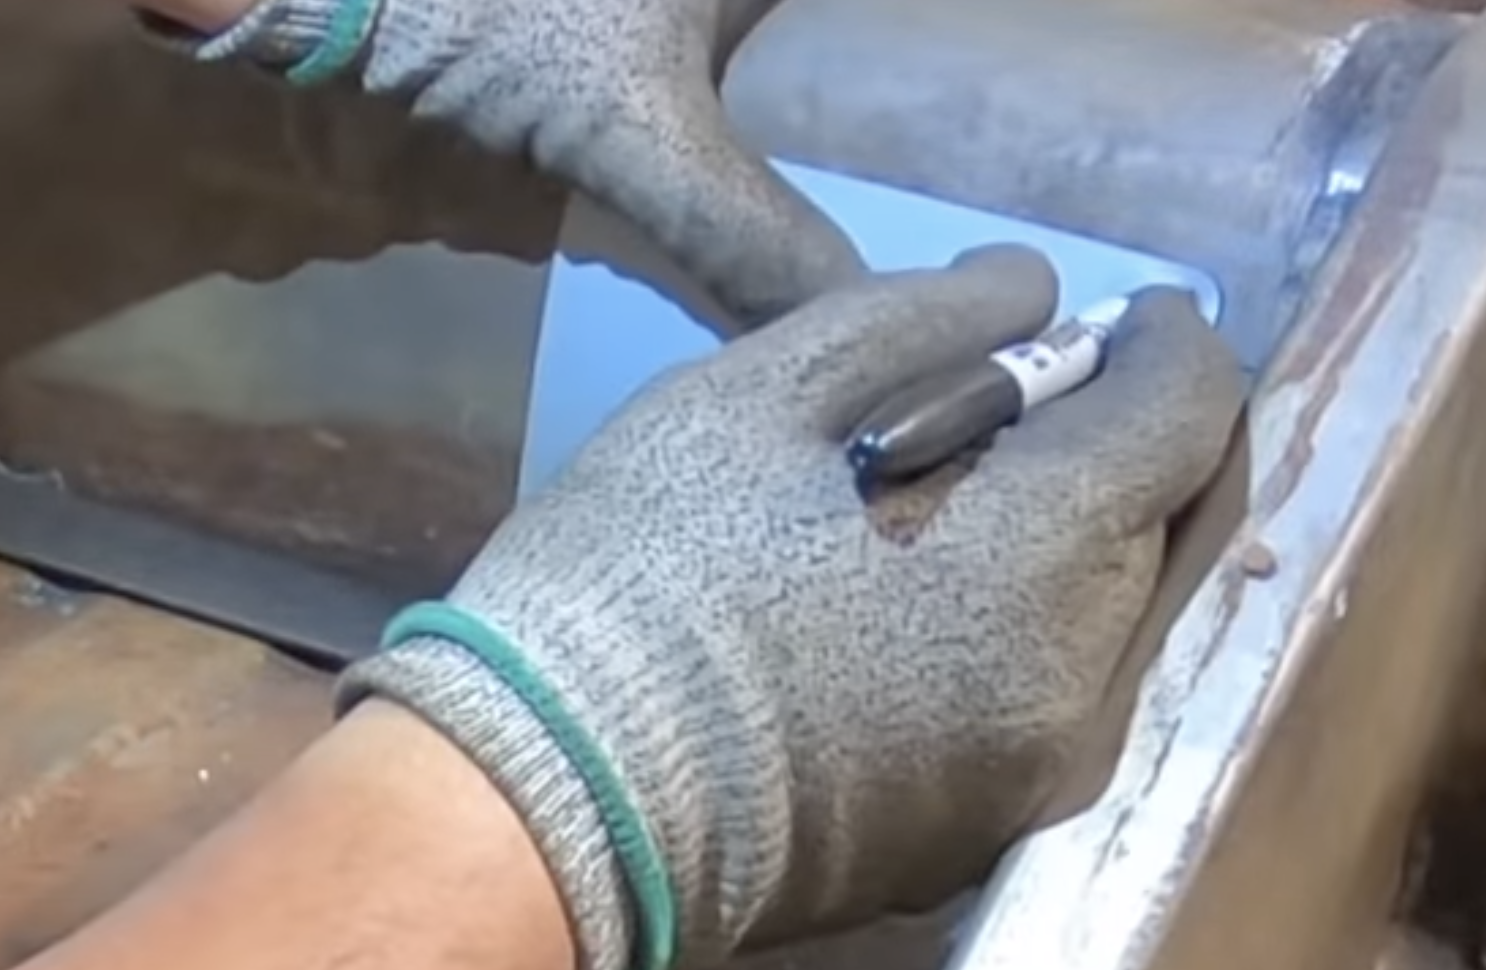
Mark & Screw
- Center the inspection plate (5″ × 4 1/2″) over the cutout — 1/2″ overlap on every side.
- Sharpie all (4) screw holes onto the tunnel.
- Drill motor + Phillips bit. Place screw, KEEP PRESSURE, drive in until seated.
- Don't use an impact — the heads cam out and strip.
- Snug only — these are sheet-metal screws, not structural fasteners.
Page 3 of the install guide PDF is a 1:1 cut template. Print at ACTUAL SIZE / 100%. Verify the 1″ reference square measures exactly 1.000″ before marking the tunnel — if not, REPRINT. "Fit to Page" / "Scale to Fit" will undersize the cutout and the plate won't sit flush.
Prime & Final
- Back screws out and remove the plate.
- Prime ALL exposed tunnel edges (cut metal rusts fast).
- Prime the back side of the inspection plate.
- Allow primer to dry per can instructions.
- Reinstall plate with the supplied screws — same pressure rule (no impact, drill motor only).
- Reinstall carpet if applicable. Verify plate sits FLUSH with the tunnel.
The 1:1 Cut Template
Page 3 of the install guide PDF. Print at Actual Size / 100% and verify the 1″ reference square measures exactly 1″. Fit-to-Page will undersize the cutout and the plate won't sit flush.
"This thing is so awesome, I bought two!! Great value, clear instructions, and quick and easy installation once you can get to the area. Would definitely recommend."
— Posted by Duane Spade"This is the second one I installed. They make it very easy to address any problems you might have within the tunnel. I recommend this item to all."
— Posted by Glen McCarty"I'm using the Chassis Inspection Plate Kit to put down the tunnel at the weld points inside so if they come loose its easy to repair and maintain as i will have to clean the inside out in this chassis before hand."
— Posted by Edward JagerThe Questions We Get Most
Doesn't cutting the tunnel weaken the chassis?
It's a fair concern, and we address it head-on in the callout above. Short version: for decades, repairs to this exact area have been made with air chisels and hole saws — usually never welded back up. Stress cracks or bends from these openings have never been seen to cause real-world failures. The Airkewld plate is better than no fix — four screws clamping at the corners give the tunnel back more rigidity than a hammered-in flap of sheet metal ever did, and the cover plate seals against road grime.
Why does the clutch tube come loose in the first place?
The tube isn't forever-affixed to the chassis — it's held by what amounts to a bent-over tab in the factory bracket. With stock pressure plates, that tab held forever. With heavier-than-stock pressure plates (most modern clutch upgrades), the cable load eventually pulls the tube out of the tab. The inspection plate gives you the access to weld it back — properly, this time.
Can I really change a clutch cable without removing my pedal assembly?
Yes — that's the headline benefit. The inspection plate gives you direct access to the clutch cable inside the tunnel. Disconnect the cable from the pedal end through the access port, pull the old cable through, feed the new one through, reconnect — without ever removing the pedal assembly. Five-minute service instead of an hour. No pedal-stop settings lost. The wing nut at the transaxle end still comes off from underneath as always — that part doesn't change.
What else can I run through the tunnel once the access is open?
Whatever modern build needs the tunnel for. We've seen this access used for: air lines for an air suspension system, stereo wiring running front-to-back, performance fuel line setups for fuel-injection conversions, brake plumbing, even data/sensor wiring. Anywhere a stock car would have a closed tunnel, your build now has a service port.
My car is finished — do I have to remove all the carpet?
No. Pull the carpet back from the area opposite the pedal assembly — just enough to expose the tunnel. Most carpet kits are loose-laid or held with a few clips and lift right back. Once the plate is installed, the carpet drops back over it and hides the cutout completely. Drop the plate any time you need to service.
Why a drill motor and not an impact driver?
The (10) supplied Phillips screws are self-tapping into thin tunnel sheet metal. Impact drivers cam out — the bit jumps out of the screw head with each hammer blow, stripping the Phillips cross before the screw bites. A drill motor with steady downward pressure keeps the bit seated and lets the screw self-tap cleanly. No impact, ever.
Do I need to weld the clutch tube?
Only if it's loose. Reach in through the cutout and check the tube where it meets the bracket on the opposite side of the tunnel. If it's still snug in the bent tab, leave it alone — just inspect and prime. If it's pulled loose, this is your one shot to fix it cleanly. Tack first, then short low-heat finish passes. The tube is thin-wall — burn through and you've replaced a $5 fix with a $200 cable run.
Will the cover plate seal against road grime and water?
Better than the stock tunnel ever did. Four screws at the corners clamp the plate flat to the tunnel face. Add a bead of seam sealer between the plate and the tunnel before final install if your car sees rain or daily-driver duty — that's standard practice and turns the cover into a fully gasketed access door.
Can I print the cut template at home?
Yes — page 3 of the install guide PDF is a 1:1 template. Print at 100% / Actual Size, then measure the 1″ reference square at the top of the page. If it isn't exactly 1.000″, reprint. "Fit to Page" will shrink everything 5–10% and your cutout will end up undersized. Not enough to ruin the install, but enough to make the plate sit unevenly.
What's your warranty?
If your inspection plate ever fails from a manufacturing defect, we replace it. Period. Email help@airkewld.com with a photo and your order number.
Real Humans. Real Phones. Real VW People.
Cutting your chassis is a one-way operation. If your dimensions don't match the photos, or you're not sure where the bracket sits — reach out before you cut. We pick up the phone. We answer the email.